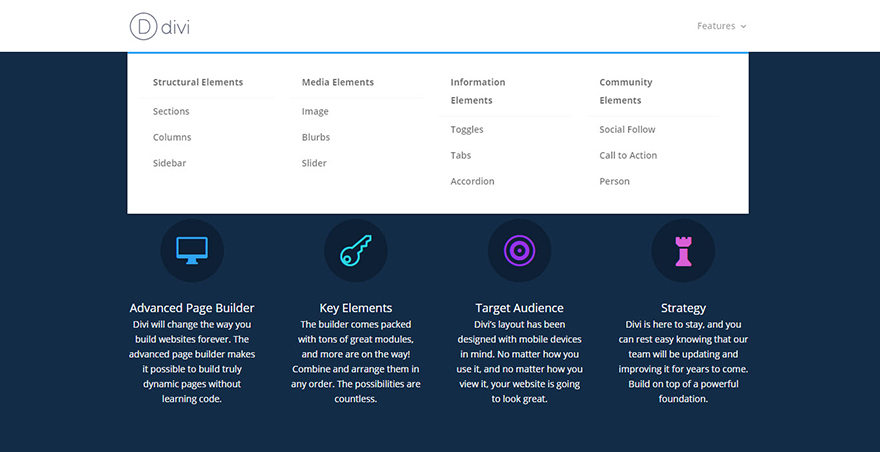
Why would you use a mega menu?
Mega menus allow users to see more links all at once without the hassle of scrolling, hovering, and remembering the contents of your menu. A good way to think about Mega Menus is that they are drop down menus within drop down menus. So instead of your normal dropdown menu which shows a submenu when hovering over your main parent links in your navigation bar, a megamenu allows you to have additional parent links and submenus within the dropdown menu.
This tutorial by Elegant Themes is a great place to start. Divi Mega Menus
How to add a mega menu to your Divi site
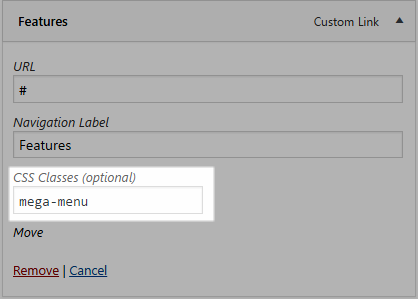
To make your mega menu you have to add a special CSS class to the main top tier tab. To do this head to your Menu found in the sidebar and select the ‘Screen Options’ button at the to of the top your page, the make sure the CSS class option is checked.
Then add a css class to the tab you want to b have a mega menu under. Find the text box labeled CSS Classes and enter the class “mega-menu”. Then save.
Add extra columns into your Divi mega menu with some custom CSS.
As default the Divi mega menu when activated shows only 4 columns, but to make better use of space, you can add more columns. So, by adding a few lines of custom CSS we can change the 4 column mega menu into a 5, 6 or 7 etc column mega menu.
Just add the required CSS to your Divi theme options CSS window.
To keep a handle on the code you are adding it’s always a good idea to comment out a heading.
Something like /** DIVI 7 COL MEGA MENU **/
5 column Divi Mega Menu
|
1
2
3
4
5
6
7
8
9
10
|
#top-menu li.mega-menu > ul > li:nth-of-type(5n) {clear: none;}#top-menu li.mega-menu > ul > li:nth-of-type(6n) {clear: none;}#top-menu li.mega-menu > ul > li {width: 20%;margin: 0;} |
6 column Divi Mega Menu
|
1
2
3
4
5
6
7
8
9
10
|
#top-menu li.mega-menu > ul > li:nth-of-type(5n) {clear: none;}#top-menu li.mega-menu > ul > li:nth-of-type(7n) {clear: none;}#top-menu li.mega-menu > ul > li {width: 16%;margin: 0;} |
7 column Divi Mega Menu
|
1
2
3
4
5
6
7
8
9
10
|
#top-menu li.mega-menu > ul > li:nth-of-type(5n) {clear: none;}#top-menu li.mega-menu > ul > li:nth-of-type(8n) {clear: none;}#top-menu li.mega-menu > ul > li {width: 14%;margin: 0;} |
8 column Divi Mega Menu
|
1
2
3
4
5
6
7
8
9
10
|
#top-menu li.mega-menu > ul > li:nth-of-type(5n) {clear: none;}#top-menu li.mega-menu > ul > li:nth-of-type(9n) {clear: none;}#top-menu li.mega-menu > ul > li {width: 12%;margin: 0;} |
Column and placement adjustments
Sometimes you may need only 2 or 3 columns. The Divi default will still be full width and looks a bit naff amd is aligned on the right. To fix this you can reduce the with and position.
The position code has several options and is written by Geno Quiroz in this post .
Some of it is here BUT NOT ALL
/** MEGA MENU **/
.et_fullwidth_nav #top-menu li.mega-menu>ul {
right: 30px!important;
left: 30px!important;
width: 400px;
}
/* default or centered style header mega menu alignment */
.et_header_style_left #top-menu li.mega-menu > ul {
left: auto!important;
right: 0;}
.et_header_style_centered #top-menu li.mega-menu > ul {
left: auto!important;}
.et_header_style_centered #top-menu > li:last-child.mega-menu > ul {
left: auto!important;
right: 0!important;}
Some sites we have used Mega Menus on:
Some sites we have used Uber Menus on:


